I was looking through my old posts and noticed that I have not made a post since July. It probably looks as though I have abandoned my blog. I really haven't though.
My blog is not very personal, but I need to tell what is going on in my life right now.
A lot has gone on in my life this year. The last few months have been hard. My mother passed away recently. She had been very sick. I miss her terribly. Sometimes I think that there can be no way she is really gone, but then reality hits.
I wish she could have stayed longer than the short while that she did. I do know that she is in Heaven. My Mom was a wonderful person and I know for sure that she is now in Heaven!
I know that the eternal life in Heaven is the most beautiful life that we will all have someday if we love God and Our lives here on earth are nothing compared to the life we will have. Our life on earth is short. I beleive Heaven is beyond imagination.
I know everyone has their own belief and thinking. My belief is there is a God who is in control of everything, he is our creator who also created every living thing, he has a plan for all of us, his hands are in each of our lives, God loves us all, there is a life after the one here that is so much more beautiful, there is a Heaven, and that our loved ones are there watching over us, and waiting for us to join them.
Mom, I know your spirit is with me always. I will remember all the love you have given to me, all the beautiful memories of our life together, and I will always know you beautiful spirit. Thank you for your love and caring. I love you and always will.
Belle
homesteaderbelle@yahoo.com
Thursday, October 15, 2009
Monday, July 13, 2009
How to make Fried Zucchini - with pictures
We have quite a few zucchini plants in the garden and we are getting a lot of zucchini from them!
My family uses zucchini in a lot of different ways. We use zucchini in cakes, muffins, and breads. We cook zucchini on the grill with potatoes and other veggies wrapped in aluminum foil, on kabobs (marinated meat with veggies and fruit on a skewer), and we make Fried Zucchini.
Fried Zucchini is my family's favorite! Not a summer goes by without my family eating Fried Zucchini!
A week or so ago, my aunt, my cousin, and my Granny came over and we fried zucchini together. I took some pictures of the making of Fried Zucchini. I am going to share the pictures I took and how to make it, for those of you who do not know how.
 Now, put enough vegetable oil in the skillet to cover the bottom. Heat the skillet to about 200 degrees farenheit.
 < ......then dip both sides of medallions in flour........
 ....and put in the skillet to fry.
My family uses zucchini in a lot of different ways. We use zucchini in cakes, muffins, and breads. We cook zucchini on the grill with potatoes and other veggies wrapped in aluminum foil, on kabobs (marinated meat with veggies and fruit on a skewer), and we make Fried Zucchini.
Fried Zucchini is my family's favorite! Not a summer goes by without my family eating Fried Zucchini!
A week or so ago, my aunt, my cousin, and my Granny came over and we fried zucchini together. I took some pictures of the making of Fried Zucchini. I am going to share the pictures I took and how to make it, for those of you who do not know how.
Fried Zucchini
You will need:
Zucchinis - Small, young zucchinis are best for frying
2-4 large eggs
approximately 2 cups of all-purpose flour
Salt
Pepper
Vegetable Oil
A Large skillet for frying - An electric skillet is great to use because it keeps an even temperature, but any other large skillet will also work well.
a pair of tongs
two small bowls (one for egg and one for flour)
a plate lined with a paper towels or napkins
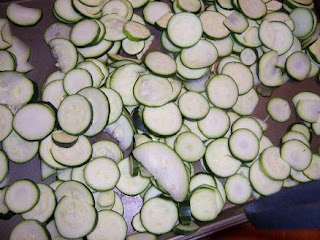
First, wash all of the zucchinis and slice them into medallions. Thin sliced medallions will be crispy on the outside and with a bit of softness on the inside. Thick sliced medallions will have a crisp outside and a soft inside, like a french fry. Super thin slice medallions will be very crispy, like a potatoe chip, but they often burn.
Throw away the tips of the zucchinis.
Lightly salt the medallions.
Lightly salt the medallions.
 Now, put enough vegetable oil in the skillet to cover the bottom. Heat the skillet to about 200 degrees farenheit.
 Put two eggs in a bowl, lightly salt them, and whip them. In the other bowl, put one to two cups of flour.
Dip a few medallions at a time in the egg.......
< ......then dip both sides of medallions in flour........
 ....and put in the skillet to fry.
 Brown both sides of the medallions. After both side of the medallions are browned, put them on a the plate with a paper towl on it. Serve Fried Zucchini warm.

Tips: If the bowl of egg gets watery from dipping zucchini, it is best to get a new bowl of egg.
If the oil in the skillet gets too hot, it will burn. If the oil is getting too hot, the heat should be turn down to a lower temperature.
If the skillet looks like there isn't enough oil or like it is running out of oil, add more.
Thank you so much for visiting my blog! If you like my blog, you are welcome to become a follower of my blog or you can subscribe to my blog and you will be notified by email every time I make a post.
If you have any questions or comments, you are welcome to email me @ homesteaderbelle@yahoo.com
Belle
Saturday, June 6, 2009
How to Pasteurize Goat Milk
I do recommend to anyone that drinks milk, especially children, to drink pasteurized milk versus drinking milk raw (unpasteurized). Pasteurizing milk kills bad bacteria that could be harmful to the body.
Many people, who have arthritis, like to drink goat's milk raw because the raw goat's milk contains something that pasteurized milk does not have that is supposed to help the arthritic pain.
For my own family, I pasteurize our goat milk.
The pasteurization process is really simple!
For pasteurizing your own milk you will need -
a Candy Thermometer
a Clean piece of cheese cloth or a flour sack dish towel
a Clean Stainless Steel Pot
a Clean Metal Spoon for stirring the milk
First, strain the milk through the piece of clean cheesecloth or a clean flour sack dishtowel into the clean stainless steel pot. Straining the milk will catch all of the hairs or other things that might have fallen into the milk during milking time.
Note - The piece of material you use for straining needs to be very clean. It shouldn't be washed in harsh detergents or fabric softeners, especially detergents that are scented. I suggest getting a few towels to keep for straining milk through only! To make sure your towel is clean enough, you can alway dip it in boiling water, that should kill anything that isn't good in your milk.

Many people, who have arthritis, like to drink goat's milk raw because the raw goat's milk contains something that pasteurized milk does not have that is supposed to help the arthritic pain.
For my own family, I pasteurize our goat milk.
The pasteurization process is really simple!
For pasteurizing your own milk you will need -
a Candy Thermometer
a Clean piece of cheese cloth or a flour sack dish towel
a Clean Stainless Steel Pot
a Clean Metal Spoon for stirring the milk
a Bowl of cold water with lots of ice
and clean glass *containers for storing the milk
and clean glass *containers for storing the milk
First, strain the milk through the piece of clean cheesecloth or a clean flour sack dishtowel into the clean stainless steel pot. Straining the milk will catch all of the hairs or other things that might have fallen into the milk during milking time.
Note - The piece of material you use for straining needs to be very clean. It shouldn't be washed in harsh detergents or fabric softeners, especially detergents that are scented. I suggest getting a few towels to keep for straining milk through only! To make sure your towel is clean enough, you can alway dip it in boiling water, that should kill anything that isn't good in your milk.

Attatch the candy thermometer to the pot. (If you don't have a candy thermometer that attches to the pot, dip the thermometer into the pot often to check the milk's temperature.)
Set the heat of stove top to medium high. Stir the milk as often as possible if not constant.

Watch the temperature on the thermometer. When the temperature on the thermometer reaches 165 degrees Farenheit, set a timer for 15 seconds. When the timer ends, put your pot of milk into a the bowl of cold, icey water and stir.
Try to get the pot of milk into the water as quickly as possible. The quick cooling of the milk gives the milk a better flavor.

When the ice in the cold water melts, take the milk from the bowl of water, pour into clean containers, and put the containers of milk into the freezer for further cooling.

It shouldn't take the milk very long to get cool in the freezer.
After the milk has cooled in the freezer, put the milk into the fridge. The milk is now without the bad bacteria and ready to drink. Give the milk a good shake and enjoy!
After the milk has cooled in the freezer, put the milk into the fridge. The milk is now without the bad bacteria and ready to drink. Give the milk a good shake and enjoy!
* Containers - Never use plastic containers to put milk in. Plastic holds bacteria. Don't use any container to store milk in that has cracks, seams, or crevices, those little places are just a place for bacteria to hide.
I have found glass containers are best for storing milk. I like canning (Ball, Kerr, Mason) jars to keep my milk in. Each milking's milk in in it's own container, I never have to worry about milk from different milkings getting put in the same container, and canning jars make giving the milk a good shake easy.
Everything used to pasteurize the milk should be as clean as possible.
Thank you so much for visiting my blog! Please check out some of my other posts and visit my blog again soon!
~Belle~
Please visit my store: http://www.homesteaderbelle.blogspot.com/
Friday, May 8, 2009
Fried Fish, a LaMancha Dairy Goat, and Homemade Goat Milk Ice Cream
Tonight, for supper, my family and I had fried fish. My sister, brother, and dad all went fishing yesterday. They caught a bunch of Blue Gill.
The fish we fried was delicious!

Earlier today, my sister made some homemade vanilla ice cream with all of the goat's milk that she has been getting.
The ice cream was very good!
 My sister bought a LaMancha dairy goat about a month ago. My family has had LaMancha dairy goats in the past and loved the taste of the LaMancha's milk. Our last LaMancha doe we had died about three years ago from old age. Since the death of our last LaMancha doe, we have had Alpine goats. The milk from the Alpine does is nothing like the milk from the LaManchas (in my family's opinion). Nobody in the family liked the milk from the Alpines, so the Alpines are now dried up and we drink the milk from my sister's LaMancha doe. My family has found, by experience with dairy goats, that LaMancha goat's milk is much more creamier and has a better flavor than the Alpine's milk. So, for now on, I think that we will only keep LaMancha goats for milk.
My sister had been looking to buy a LaMancha dairy goat for over a year. LaManchas are difficult to find in this area. She did finally find one.
The doe that she bought gives 3 - 4 quarts of delicious, creamy milk a day. The milk has lots of cream in it. My sister has been taking all of the cream from the milk and making butter with it.
I found a recipe online for homemade Mozzerella cheese that I want to make soon. If the recipe is a good one, I will share it here on my blog.
Below is a picture of the delicious, creamy goat milk.
 It is wonderful to have fresh milk everyday and to know exactly where it came from.
Thank you for reading and visiting my blog! Please leave a comment if you would like to. Please come back very soon to my blog!
~Belle~
Check out my shop here - http://www.homesteaderbelle.blogspot.com/
Thursday, April 16, 2009
This Year's Garden so far...........
Has anyone started their gardens yet? I have started my gardening this year. I have only planted seeds indoors.
I have planted Rudker tomatoe seeds in a planter inside the house. The seeds have sprouted and I now need to transplant them in their own seperate containers. I think I will do that later on today.

There is a lot of grass that came up with the tomatoes.
 Last night, I planted Parsley and Oregano in the Chia herb kit. I still have two pots to plant in, but I have not decided what to plant in them yet. Oregano is an herb a use very often. I put Oregano on my homemade garlic bread. I use Parsley often too. I like to make Parsley potatoes and I use Parsley in my homemade vegetable dip. I will have to share that recipe sometime.
It will be so nice to have fresh herbs growing right in my kitchen!
 The pots are covered with plastic wrap incase you were wondering what the clear stuff was.
 My family and I were going to plant the potatoes a week or two ago, I am sure glad that we didn't! We have had cold weather and lots of rain. The potatoes would have just rotted in the ground if we would have planted them. The rain has stopped and the ground is starting to dry up. When the ground gets a bit dryer, which will probably be in a few days, we will plant the potatoes.
I planted Chamomile seeds in a planter the other day. After I got them all planted, I left the planter on the porch steps so the seeds could be in the sun. A few hours later, I looked outside and I saw dirt all over the step and a dug-out spot in the planter. I am guessing my brother's dog made that mess. I was upset when I first saw it, but now I am over it. I guess those things tend to happen when a puppy is around. Oh well.......
 In a month or two, it will be time to plant green beans and corn. We let some of the corn and beans go to seeds and we saved the seeds. We will not have to buy corn or bean seeds this year.
I have planted Rudker tomatoe seeds in a planter inside the house. The seeds have sprouted and I now need to transplant them in their own seperate containers. I think I will do that later on today.

There is a lot of grass that came up with the tomatoes.

Every year I usally buy Rudker tomatoe plants, but I heard that this year, in my area, Rudker tomatoe plants will be difficult to find. I saved the seeds from the rudker plants I had last year, so I didn't have to buy any tomatoe seeds this year. Rudker tomatoe seeds can not be found in stores in this area. If I was going to buy some, I would have to order them online.
For Christmas, from my granny, I got a Chia Gourmet Herb Growing kit. The kit came with different kinds of herb seeds, four terra cotta pots, and four Chia sponges for planting the seeds in. I was so happy to get this gift!
 Last night, I planted Parsley and Oregano in the Chia herb kit. I still have two pots to plant in, but I have not decided what to plant in them yet. Oregano is an herb a use very often. I put Oregano on my homemade garlic bread. I use Parsley often too. I like to make Parsley potatoes and I use Parsley in my homemade vegetable dip. I will have to share that recipe sometime.
It will be so nice to have fresh herbs growing right in my kitchen!
 The pots are covered with plastic wrap incase you were wondering what the clear stuff was.
 My family and I were going to plant the potatoes a week or two ago, I am sure glad that we didn't! We have had cold weather and lots of rain. The potatoes would have just rotted in the ground if we would have planted them. The rain has stopped and the ground is starting to dry up. When the ground gets a bit dryer, which will probably be in a few days, we will plant the potatoes.
I planted Chamomile seeds in a planter the other day. After I got them all planted, I left the planter on the porch steps so the seeds could be in the sun. A few hours later, I looked outside and I saw dirt all over the step and a dug-out spot in the planter. I am guessing my brother's dog made that mess. I was upset when I first saw it, but now I am over it. I guess those things tend to happen when a puppy is around. Oh well.......
Below is a picture of it. The picture doesn't show the much of the damage the dog made.
 In a month or two, it will be time to plant green beans and corn. We let some of the corn and beans go to seeds and we saved the seeds. We will not have to buy corn or bean seeds this year.
 This is just an update of what's going in the garden.
Thank you for reading my blog. Please come back to my blog again!
-Belle-
Please visit my store - http://www.homesteaderbelle.blogspot.com/
Wednesday, April 1, 2009
Pecan Tarts
 My Granny's birthday was this month. For her birthday, I made Pecan Tarts. She loved them! The recipe for the tarts is below.
Pecan Tarts
First, make the pie dough. I use a double-crust pie dough recipe.
It seems like the double-crust recipe I use makes just enough dough for the amount of pecan filling.
Pie dough recipe
2 cups of All-purpose Flour
1 Teaspoon of Salt
2/3 cup of Shotening
6 -7 Tablespoons of cold Water
In a mixing bowl, stir together flour and salt. Cut in the shortening till pieces are the size of small peas. Sprinkle two to three tablespoons of the cold water over mixture. Stir and cut the mixture. Add as much more of the cold water as needed.
Form the dough in a ball and put on a floured surface.
 Roll the dough out to the thickness of 1/8 - 1/4 inch.
 Lay the tart pan face - down on the dough and cut around it 1/4 inch away from the pan.
Press the piece of cut dough into the tart pan. Apply enough pressure to the dough so that the dough will stay in place inside of the tart pan.
 After all of the tart pans have pie dough they can be filled with the pecan tart filling.
Pecan Tart Filling
1 cup of Light Corn Syrup
3 Large Eggs
2 Tablespoons of Butter (not margarine)
1 teaspoon of Pure Vanilla Extract
2 cups of Pecan Halves
Preheat the oven to 350 degrees farenheit. In a mixing bowl, mix together using a spoon corn syrup, eggs, sugar, butter, and vanilla. Stir in pecans. Pour pecan tart filling into tart pans.Put all of the tart pans onto a baking sheet. Bake in the oven for 50 - 60 minutes or until the center surface of tart can be lighty pressed against and the surface will spring back.
Cool tarts on a wire rack.
I love to make tarts! When I am at thrift shops and yard sales, I look for tart pans. I recently went to a thrift shop that was out of town and I found seven new tart pans at $0.25 each. I was so excited to find them and to add them to my collection.
Belle
Please visit my store - http://www.homesteaderbelle.blogspot.com/
You can email me @ homesteaderbelle@yahoo.com/
Belle
Please visit my store - http://www.homesteaderbelle.blogspot.com/
You can email me @ homesteaderbelle@yahoo.com/
Tuesday, February 17, 2009
Earth Hour - Turn out your lights for one hour
I have the date Saturday, March 28, 2009 marked on my calender to shut out my lights for one hour at 8:30 p.m. (local time) for Earth Hour.
Who else is shutting off their lights for Earth Hour Saturday, March 28 2009 at 8:30 p.m. (local time)?
If you haven't heard of Earth Hour, you can read about it on this link - http://www.earthhourus.org/main.php .
Belle
Please visit my store - From the Past.
Who else is shutting off their lights for Earth Hour Saturday, March 28 2009 at 8:30 p.m. (local time)?
If you haven't heard of Earth Hour, you can read about it on this link - http://www.earthhourus.org/main.php .
Belle
Please visit my store - From the Past.
Friday, February 6, 2009
Pistachio Pudding Recipe
Mmmm....I love Pistachio Pudding. My Granny always make this dish for Thanksgiving and Christmas. Pistachio Pudding is very simple dessert to make.
~Pistachio Pudding~
To make Pistachio Pudding, you will need:
1 Box of Pistachio Instant Pudding
1 1/2 C. Miniature Marshmallows
1 (20 ounce) can Crushed Pineapple
1 Large container of Cool Whip
Maraschino Cherries

Stir all ingredients together in a large serving bowl. After all the ingredients are stirred together, put maraschino cherry halves over the top of the pudding, cover the bowl of pudding with lid or with plastic wrap, and put it in the refrigerator to set up.

Thank you for visiting my blog! Please come back and visit again soon.
Belle
My Store: From the Past
Tuesday, January 27, 2009
Making Quilts from Old Clothing
Most of the fabric that I make quilts with comes from old clothes that were going to be thrown away. I do buy new fabric when I am doing sewing for other people. All of the clothing that I can not wear or friends and family members do not want, I take the clothes and use them for making quilts and other projects.
I found this blog, http://quiltville.blogspot.com/ . The lady who has this blog makes her quilts out of old clothes. She has made some really neat quilts. She also wrote a quilt book called Scraps & Shirttails. You can preview her book here -
http://quiltville.com/scrapsandshirttailspreview.shtml .
I love to sewing and making quilts! I save all of the 100% cotton clothes for quilt making and all the flannel shirts and blue jeans I save to use in raggedy quilts and tied quilts.
Here are some pictures of one of my projects that is in the making now. It is all made from cotton clothing and the white center was made from an old sheet.
This is a quilt I am making with my mom, my sister, and my granny.


This is a Raggedy Quilt that I made with Mom, Sister, and Granny.
 -Front of Raggedy Quilt-
 -Back of Raggedy Quilt-
I found this blog, http://quiltville.blogspot.com/ . The lady who has this blog makes her quilts out of old clothes. She has made some really neat quilts. She also wrote a quilt book called Scraps & Shirttails. You can preview her book here -
http://quiltville.com/scrapsandshirttailspreview.shtml .
I love to sewing and making quilts! I save all of the 100% cotton clothes for quilt making and all the flannel shirts and blue jeans I save to use in raggedy quilts and tied quilts.
Here are some pictures of one of my projects that is in the making now. It is all made from cotton clothing and the white center was made from an old sheet.
This is a quilt I am making with my mom, my sister, and my granny.


This is a Raggedy Quilt that I made with Mom, Sister, and Granny.
Raggedy quilts are made with a blue jean top and the back of the quilt can be made with homespun, flannel, or cotton. The quilt that I made in the picture is backed with cotton. A Raggedy Quilt is not quilted, I guess it is more of a blanket than a quilt. A Raggedy Quilt is sewn so all of the seams show in the top of the quilt. When a Raggedy quilt is all sewn together, all of the seams are clipped, then the quilt is washed ,dried, and the top of the quilt has the appearance of a pair of raggedy, frayed blue jeans.
The quilt in the picture is over six years old and has been used a lot.
The quilt in the picture is over six years old and has been used a lot.
 -Front of Raggedy Quilt-
 -Back of Raggedy Quilt-
 To make a quilt top, all that is needed is a pattern, some material, a needle, and thread, you don't even need a sewing machine to make a quilt. Thin pieces of cardboard like cereal boxes, spaghetti boxes, back of old note-books work best for making a pattern.
Quilts made with small pieces, like the Double Wedding Ring quilt I have shown above, are wonderful to take along wherever I go, especially when I go somewhere where I have to wait, like when I go to the doctor, the dentist, etc..... I can get a lot of sewing done while I am sitting and waiting, actually, it seems like I can get a quilt done much faster sewing by hand than I can while sitting at the sewing machine. When I am sewing a quilt by hand, I can work on it anytime, anywhere.
I keep all of the pieces to each quilt in their own container so I don't get them mixed up with other projects I am working on. I keep my projects in tins, baskets, purses, etc....
Belle
Please visit my store - http://www.homesteaderbelle.blogspot.com/
Tuesday, January 13, 2009
Vintage Doiles, Wilton Garter, and Book
I have some things around the house that I am wanting sell, so I have decided to post them right here on my blog.
 This is a lovely country blue color doile. It is about 10 inches in diameter. It is a pineapple design. I will sell this for $+ $1.50 shipping costs.

 The picture above is a new in package Wilton Garter. It is very pretty! I would like to sell this for $3.50 + $1.50 shipping costs.
 This is one of those Doiles that with starch it will stand up with a nice ruffly edge. This is a nice vintage piece. This doile is about seven inches in diameter. It is for sale at the price of $ + $1.50 shipping costs.
 This is a lovely country blue color doile. It is about 10 inches in diameter. It is a pineapple design. I will sell this for $+ $1.50 shipping costs.
Cottage Living
Designing Comfortable Country Retreats
by Ellen M. Plante
This book is in excellent condition with dust-jacket. Almost every page has a large color photo of cottage homes. You could get some good decorating tips and ideas from this book. I want to sell this book for $8.00 + shipping costs that I will calculate with your zip code.
If you are interested in purchasing any of these items, send me an email. My email address is hometeaderbelle@yahoo.com . I accept Pay-Pal, checks, or money orders. If you want an item, but you can't pay for the prices that I have listed, make an offer. I do combine shipping. I will ship to countries outside the USA, but I will have to charge more on the shipping cost.
I will be listing more items here on my blog soon. Come back and visit my blog again!
Thank you for looking!
Belle
Sunday, January 4, 2009
Quick-Change Cloth Pad Give Away!

I am having a giveaway for a Quick-Change cloth menstrual pad. You can read the rules of the giveaway and sign up there to win it at my store, From the Past. Be sure to leave you email or someway of cotacting you in your entry.
Thank you for reading my blog.
Belle
http://homesteaderbelle.blogspot.com/2008/12/blog-post.html
Subscribe to:
Posts (Atom)